6. Mysql 과 메일 서버 연동 및 최종 연동 확인 : 여기는 연동 과정만 작성하고 outlook 연동은 다음글에 작성하겠습니다.
드디어!! mysql + postfix + dovecot 연동을 마치고 연동하고 실제 메일 수신, 발신까지 연동하는 글을 쓰게 되었습니다.
다만 글을 쓰면서도 걱정스러운 부분은 얕은 지식으로 겨우 연동을 한 것이고, 글을 쓰는 것이기 때문에 분명 중간중간 틀린 부분이 있을 수 있습니다. 또한 사용자의 환경에 따라서 제 설정파일 그대로 쓰더라도 안 되는 경우가 있을 수 있습니다.
무엇보다 설정하시면서, 정말 많은 오류가 나올 것입니다. 제가 그랬거든요ㅠㅠ. 사실 관련 오류를 하나하나 다 적어가면서 여기 해결방법을 쓰고 싶었는데, 너무나 많이 발생해서 솔직히 적어두지는 못하였습니다. 그래도 제가 참고한 사이트를 적어두었으니 추후 오류 발생시 참고 부탁드립니다.
아 그리고 공부하다보니까 알게 된 것인데, mysql + postfix + dovecot 를 묶어서 docker 로 만들어둔 분들이 많이 계십니다. 사실 저처럼 직접 깔아서 만드시는게 아니라면 또한 docker 에 대해서 조금이라도 알고계시다면 docker 방식으로 하시는게 조금 더 빠를 수도 있다고 생각합니다.
여튼 3가지를 연동하게 되면 사실상 기존 메일 서버와는 완전 다른 방식으로 굴러가게 됩니다. 바로 시작하겠습니다.
- MySQL 연동과 virtual_domain, virtual_users, virtual_mailbox 을 통한 메일 서버 동작 방식
mysql 과 연동되는 메일 서버는 기존과는 완전 다른 방식으로 동작합니다. 전부 다 이해할 필요는 없다고 생각합니다. 다만 가상의 유저, 도메인, 메일박스를 만들고(정확히는 DB에 각 테이블을 만들어두고) postfix 와 dovecot 설정 파일에서 이를 찾아가게 한다. 정도라도 알아두시면 좋을 것 같습니다.
또한 다른 곳의 설명에는 alias 를 설정하는 부분들이 있습니다. 저는 mail alias 에 관한 설정은 제외하였습니다. 이 부분이 필요하신 분들은 추가 검색이 필요합니다.
- 기존 postfix + dovecot 동작 방식 : postfix 와 dovecot 두 가지만 사용하여 구동하는 방식일때는 메일을 받는 메일 디렉토리가 home/유저명/Maildir 이런 식으로 잡히게 됩니다. 즉, 리눅스 상에 실제 '유저'를 생성해야 pop3 나 imap 등으로 접속 가능하고, 메일을 보내고 받을 수 있게 됩니다.
당연하게도 이러한 방식에는 엄청난 문제점이 있습니다. 대체로 3가지 문제점이 있는데 하나는 보안적인 이슈와 하나는 메일 관리 이슈, 마지막으로 2개 이상의 메일 도메인 사용 문제 입니다.
첫 번째는 가장 중요한 보안 이슈입니다. 이는 사실 당연한 것인데 메일 서버를 사용하기 위한 '실제 유저 계정' 이 존재하기 때문에 나오는 문제입니다. 메일 서버를 사용하기 위한 실제 유저가 있어야하며, 따라서 유저 계정이 존재하기 때문에 해킹 등의 보안 문제가 발생할 가능성이 큽니다.
두 번째는 메일 관리 이슈 입니다. 각 유저마다 home 디렉토리안에 유저 별 홈이 존재하고 그 안에 Maildir 가 존재한다면 한 두명일때는 사실 크게 상관없을 수 있는데, 유저가 100명, 1000명이 넘어가면...정말 관리하는데 큰 문제가 발생합니다. 단순히 유저별 메일함을 관리한다는 차원을 넘어서 'A' 계정 유저를 삭제한다고 하면 메일함도 지워야하는데 그때마다 유저를 삭제해야하고, 유저 디렉토리를 삭제해야하고...난리가 나게 됩니다.
마지막은 2개 이상의 메일 도메인을 사용할때의 문제입니다. 메일 도메인이 2개 이상이 되는 경우도 관리하기가 힘들게 됩니다. 즉 mail.A.com 으로만 사용하는게 아니라 mail.B.com 도 사용하게 된다면 메일함이 꼬여서 설정이 더욱 힘들어집니다.
- Mysql + postfix + dovecot 동작 방식 : mysql 과 연동하는 순간 이는 가상 도메인과 가상 유저를 사용하면서 모두 사라지게 됩니다(virtual_domain, virtual_users, virtual_mailbox).
먼저 보안 이슈에서 대두되는 실제 유저로 인한 보안 이슈는 DB안에 있는 virtual_users 라는 테이블을 참조하여 가상의 유저를 사용함으로써 보안 이슈가 사라지게 됩니다.
다음으로 메일 관리 부분에서 나오는 문제는 기존의 home/유저명/Maildir 에 메일이 저장되는 것이 아니라 virtual_mailbox 가상의 메일 박스를 참조하여 일정한 곳에 메일을 몰아둠으로써 추후 관리를 편하게 만듭니다(이 부분은 사진으로 보여드리겠습니다)
마지막으로 2개 이상의 메일 도메인을 사용할 때의 문제도 해결 가능합니다. 왜냐하면 virtual_domain 테이블을 통해서 2개 이상의 도메인을 넣어두고 추후 이것을 참조해서 가도록 하면 되거든요ㅎ
- 메일 서버 기본 정보
메일 서버 도메인명 : mail.hjproejct.kro.kr => @ 뒤쪽에 오는 도메인이라고 생각하면 됩니다.
사용 포트 : smtp , smtps , imaps, pop3s
DB : MariaDB(Mysql) => 설치는 mariaDB 로 했으나 추후 편의상 표기는 mysql로 하겠습니다(사실 그만큼 차이가 없습니다)
메일 서버를 위한 패키지 : postfix, dovecot
메일 도착 위치 : /var/mail/메일도메인/각 유저명
1. postfix, dovecot 관리 유저 생성
- 다음 명령어를 사용해 메일 서버 관리 유저를 생성합니다. 이 유저는 dovecot 과 postfix 의 권한을 해당 유저에게 줌으로써 일종의 관리자 역할을 하는 유저입니다. 물론 일반적인 로그인이 되지 않는 유저입니다. 앞으로 메일 서버 관리 유저는 여기서 생성하는 vir_mailbox 를 의미합니다.
## vir_mailbox 라는 유저와 그룹을 5000 id 로 생성
groupadd -g 5000 vir_mailbox
useradd -g vmail -u 5000 vir_mailbox -d /var/mail
- 다음 명령어로 /var/mail 의 권한을 vir_mailbox 로 변경합니다. 이는 메일이 도착할 디렉토리인 /var/mail/ 디렉토리의 권한을 얻어 추후 에러가 없게 하기 위함입니다.
chown -R vmail:vmail /var/mail- 다음 명령어로 vir_mailbox 에 /etc/dovecot 의 권한을 넣어줍니다.
chown -R vir_mailbox:dovecot /etc/dovecot설정 확인

2. MySQL 설정 시작
먼저 메일 서버와 관련되어 도메인, 유저를 저장하고 불러올 수 있도록 DB와 테이블을 생성합니다.
SQL 쿼리에 관한 부분은 솔직히 저도 잘 모르기 때문에 설명할 수 있는 부분이 거의 없습니다. 궁금한 부분은 따로 검색 부탁드립니다.
1) Mailbox DB 생성
create database mailbox;
2) 해당 DB 를 사용할 수 있도록 유저에게 권한을 부여합니다.
GRANT SELECT ON mailbox.* TO '[내 유저명]'@'127.0.0.1' IDENTIFIED BY '[유저패스워드]';
flush privileges;
3) virtual_domains , virtual_users : 가상 도메인 테이블, 가상 유저 테이블 생성
- virtaul_domains
id 가 primary key 로 생성됨.
CREATE TABLE `virtual_domains` (
	`id` INT(11) NOT NULL AUTO_INCREMENT,
	`name` VARCHAR(50) NOT NULL COLLATE 'utf8_general_ci',
	PRIMARY KEY (`id`) USING BTREE
)
COLLATE='utf8_general_ci'
ENGINE=InnoDB
AUTO_INCREMENT=2
;
- domains 테이블에 사용자의 가상 도메인 정보를 넣어둡니다.
참고로 여기서 도메인을 여러개 등록하면 등록한 여러개의 도메인을 모두 사용할 수 있게 됩니다.
INSERT INTO `mailbox`.`virtual_domains`
   (`id` ,`name`)
VALUES
   ('1', '[mail.hjproject.kro.kr(사용자 도메인 주소)]');
- virtaul_users
domains 쪽의 PM인 id 를 dmain_id 로 가져오고, email 과 password 에는 각 유저의 메일과 패스워드가 들어가며, box 는 추후 postfix 와 db 연동 확인을 위해 넣어둔 부분입니다. email에서 user 부분을 사용할 예정입니다.
CREATE TABLE `virtual_users` (
	`id` INT(11) NOT NULL AUTO_INCREMENT,
	`domain_id` INT(11) NOT NULL,
	`password` VARCHAR(255) NOT NULL COLLATE 'utf8_general_ci',
	`email` VARCHAR(120) NOT NULL COLLATE 'utf8_general_ci',
	`box` VARCHAR(120) NOT NULL COLLATE 'utf8_general_ci',
	PRIMARY KEY (`id`) USING BTREE,
	UNIQUE INDEX `email` (`email`) USING BTREE,
	INDEX `domain_id` (`domain_id`) USING BTREE,
	CONSTRAINT `virtual_users_ibfk_1` FOREIGN KEY (`domain_id`) REFERENCES `mailbox`.`virtual_domains` (`id`) ON UPDATE RESTRICT ON DELETE CASCADE
)
COLLATE='utf8_general_ci'
ENGINE=InnoDB
AUTO_INCREMENT=5
;
메일을 사용할 유저 정보를 테이블에 삽입합니다.
여기서 encrypt 부분은 암호화를 위한 부분입니다. 암호화는 SHA 를 통해 암호화되며, 패스워드 + $6$ + 랜덤 숫자 를 합쳐서 암화화 됩니다.
DB 패스워드 암호화는 dovecot 에 관련설정이 있어서 꼭 암호화가 필요합니다. 처음에 귀찮아서 안하니까 나중에 에러가 나더라구요.
INSERT INTO `mailbox`.`virtual_users`
   (`id`, `domain_id`, `password` , `email`, `box`)
VALUES
   ('1', '1[사용할 도메인의 id', ENCRYPT('[패스워드]', CONCAT('$6$', SUBSTRING(SHA(RAND()), -16))), 'test@mail.hjproject.kro.kr[사용할 이메일 주소]', 'test[이메일에서 유저]');
추가로 DB 유저의 수정이 필요할 때 사용할 수 있는 업데이트문
UPDATE virtual_users SET PASSWORD = ENCRYPT('[패스워드]', CONCAT('$6$', SUBSTRING(SHA(RAND()), -16))) WHERE id = [virtual_user id number];설정 확인
DB 에 접속해서 확인했을 때 virtual_domains, virtual_users 두가지만 확인되면 됩니다. virtual_aliases 는 무시해주세요
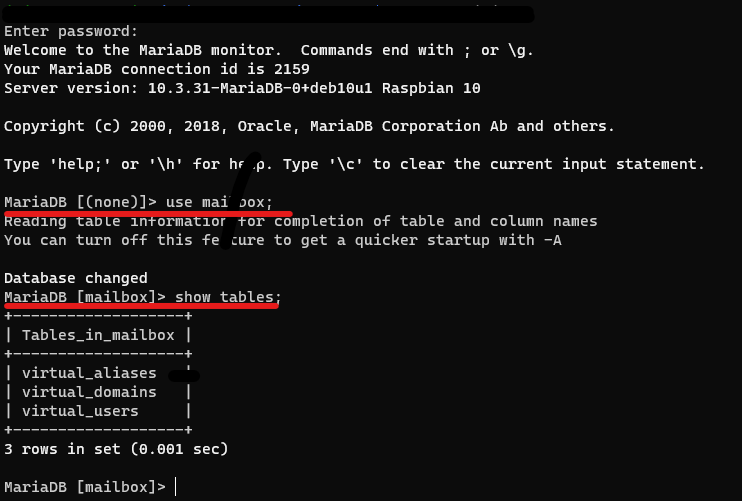
다음으로 테이블 내용을 확인해주시면 됩니다.
다음 명령어로 확인하실 수 있습니다.
select * from virtual_domains;
select * from virtual_users;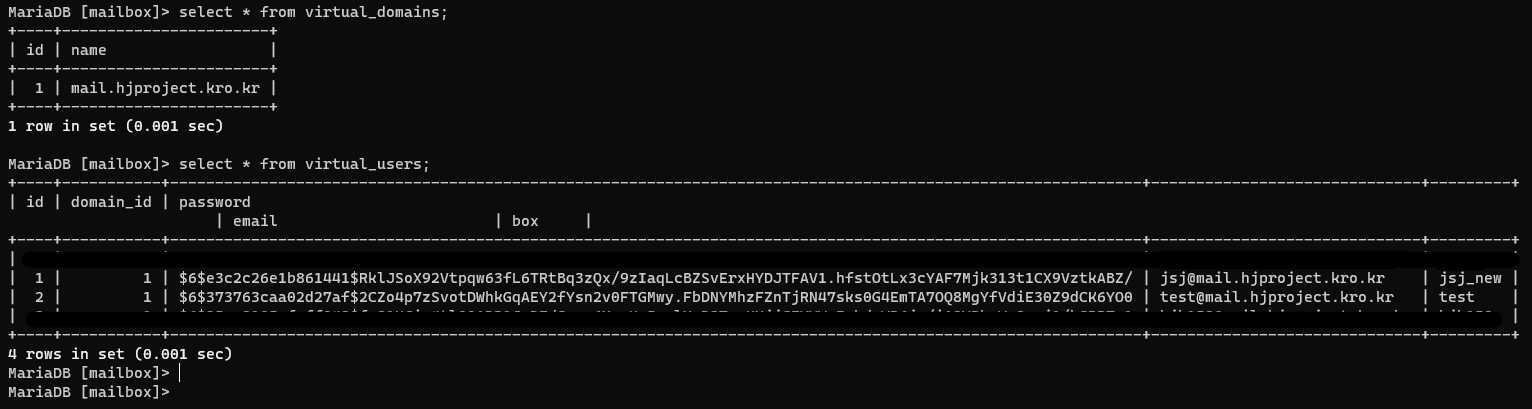
3. postfix 설정 시작
다음으로 postfix 설정부터 시작하겠습니다. postfix 는 다음 파일들을 수정, 생성합니다.
당연히 수정하시기 전에 백업은 필수입니다.
1) main.cf 수정
# SMTP 접속 시 배너
smtpd_banner = $myhostname ESMTP $mail_name:My_Mailbox
biff = no

append_dot_mydomain = no

# Uncomment the next line to generate "delayed mail" warnings
#delay_warning_time = 4h

readme_directory = no

# TLS parameters : TLS 설정 파라미터
smtpd_use_tls=yes
smtpd_tls_auth_only = yes
smtpd_tls_session_cache_database = btree:${data_directory}/smtpd_scache
smtp_tls_session_cache_database = btree:${data_directory}/smtp_scache

smtpd_tls_security_level = may
smtp_tls_security_level = may

smtp_use_tls = yes
smtpd_tls_received_header = yes
smtpd_tls_ask_ccert = yes
smtpd_tls_loglevel = 4

# SSL 파일 위치 적기
smtpd_tls_cert_file = /etc/postfix/ssl/certificate.crt
smtpd_tls_key_file = /etc/postfix/ssl/private.key

# smtp 인증 시 dovecot 연동한다는 의미
smtpd_sasl_type = dovecot
smtpd_sasl_path = private/auth
smtpd_sasl_auth_enable = yes
smtpd_recipient_restrictions = permit_sasl_authenticated permit_mynetworks reject_unauth_destination
#smtpd_relay_restrictions = permit_mynetworks,permit_sasl_authenticated,reject_unauth_destination

smtpd_tls_security_level = may

#### 매우 중요 ####
# 가상 전송,도메인, 메일박스(유저) 설정하는 내용 #
# transport 에서 lmtp 를 사용한다는 것을 기억해두어야함 #
virtual_transport = lmtp:unix:private/dovecot-lmtp
virtual_mailbox_domains = mysql:/etc/postfix/mysql/virtual_domains_maps.cf
virtual_mailbox_maps = mysql:/etc/postfix/mysql/virtual_mailbox_maps.cf

# See /usr/share/doc/postfix/TLS_README.gz in the postfix-doc package for
# information on enabling SSL in the smtp client.

#smtpd_relay_restrictions = permit_mynetworks permit_sasl_authenticated defer_unauth_destination

myhostname = [메일 도메인]
myorigin = /etc/mailname
mydestination = localhost
relayhost =
mynetworks = 127.0.0.0/8 [::ffff:127.0.0.0]/104 [::1]/128
mailbox_size_limit = 0
recipient_delimiter = +
inet_interfaces = all
inet_protocols = all

compatibility_level = 2
relay_domains = $mydestination
2) master.cf 수정
#
# Postfix master process configuration file.  For details on the format
# of the file, see the master(5) manual page (command: "man 5 master" or
# on-line: http://www.postfix.org/master.5.html).
#
# Do not forget to execute "postfix reload" after editing this file.
#
# ==========================================================================
# service type  private unpriv  chroot  wakeup  maxproc command + args
#               (yes)   (yes)   (no)    (never) (100)
# ==========================================================================
smtp      inet  n       -       n       -       -       smtpd
#smtp      inet  n       -       y       -       1       postscreen
#smtpd     pass  -       -       y       -       -       smtpd
#dnsblog   unix  -       -       y       -       0       dnsblog
#tlsproxy  unix  -       -       y       -       0       tlsproxy
submission inet n       -       -       -       -       smtpd
  -o syslog_name=postfix/submission
  -o smtpd_tls_security_level=encrypt
  -o smtpd_sasl_auth_enable=yes
  -o smtpd_tls_auth_only=yes
  -o smtpd_reject_unlisted_recipient=no
  -o smtpd_client_restrictions=$mua_client_restrictions
  -o smtpd_helo_restrictions=$mua_helo_restrictions
  -o smtpd_sender_restrictions=$mua_sender_restrictions
#  -o smtpd_recipient_restrictions=
  -o smtpd_relay_restrictions=permit_sasl_authenticated,reject
  -o milter_macro_daemon_name=ORIGINATING
smtps     inet  n       -       n       -       -       smtpd
  -o syslog_name=postfix/smtps
  -o smtpd_tls_wrappermode=yes
  -o smtpd_sasl_auth_enable=yes
  -o smtpd_reject_unlisted_recipient=no
  -o smtpd_client_restrictions=$mua_client_restrictions
  -o smtpd_helo_restrictions=$mua_helo_restrictions
  -o smtpd_sender_restrictions=$mua_sender_restrictions
#  -o smtpd_recipient_restrictions=
  -o smtpd_relay_restrictions=permit_sasl_authenticated,reject
  -o milter_macro_daemon_name=ORIGINATING
#628       inet  n       -       y       -       -       qmqpd
pickup    unix  n       -       y       60      1       pickup
cleanup   unix  n       -       y       -       0       cleanup
qmgr      unix  n       -       n       300     1       qmgr
#qmgr     unix  n       -       n       300     1       oqmgr
tlsmgr    unix  -       -       y       1000?   1       tlsmgr
rewrite   unix  -       -       y       -       -       trivial-rewrite
bounce    unix  -       -       y       -       0       bounce
defer     unix  -       -       y       -       0       bounce
trace     unix  -       -       y       -       0       bounce
verify    unix  -       -       y       -       1       verify
flush     unix  n       -       y       1000?   0       flush
proxymap  unix  -       -       n       -       -       proxymap
proxywrite unix -       -       n       -       1       proxymap
smtp      unix  -       -       y       -       -       smtp
relay     unix  -       -       y       -       -       smtp
        -o syslog_name=postfix/$service_name
#       -o smtp_helo_timeout=5 -o smtp_connect_timeout=5
showq     unix  n       -       y       -       -       showq
error     unix  -       -       y       -       -       error
retry     unix  -       -       y       -       -       error
discard   unix  -       -       y       -       -       discard
local     unix  -       n       n       -       -       local
virtual   unix  -       n       n       -       -       virtual
lmtp      unix  -       -       y       -       -       lmtp
anvil     unix  -       -       y       -       1       anvil
scache    unix  -       -       y       -       1       scache
postlog   unix-dgram n  -       n       -       1       postlogd
#
# ====================================================================
# Interfaces to non-Postfix software. Be sure to examine the manual
# pages of the non-Postfix software to find out what options it wants.
#
# Many of the following services use the Postfix pipe(8) delivery
# agent.  See the pipe(8) man page for information about ${recipient}
# and other message envelope options.
# ====================================================================
#
# maildrop. See the Postfix MAILDROP_README file for details.
# Also specify in main.cf: maildrop_destination_recipient_limit=1
#
maildrop  unix  -       n       n       -       -       pipe
  flags=DRhu user=vmail argv=/usr/bin/maildrop -d ${recipient}
#
# ====================================================================
#
# Recent Cyrus versions can use the existing "lmtp" master.cf entry.
#
# Specify in cyrus.conf:
#   lmtp    cmd="lmtpd -a" listen="localhost:lmtp" proto=tcp4
#
# Specify in main.cf one or more of the following:
#  mailbox_transport = lmtp:inet:localhost
#  virtual_transport = lmtp:inet:localhost
#
# ====================================================================
#
# Cyrus 2.1.5 (Amos Gouaux)
# Also specify in main.cf: cyrus_destination_recipient_limit=1
#
#cyrus     unix  -       n       n       -       -       pipe
#  user=cyrus argv=/cyrus/bin/deliver -e -r ${sender} -m ${extension} ${user}
#
# ====================================================================
# Old example of delivery via Cyrus.
#
#old-cyrus unix  -       n       n       -       -       pipe
#  flags=R user=cyrus argv=/cyrus/bin/deliver -e -m ${extension} ${user}
#
# ====================================================================
#
# See the Postfix UUCP_README file for configuration details.
#
uucp      unix  -       n       n       -       -       pipe
  flags=Fqhu user=uucp argv=uux -r -n -z -a$sender - $nexthop!rmail ($recipient)
#
# Other external delivery methods.
#
ifmail    unix  -       n       n       -       -       pipe
  flags=F user=ftn argv=/usr/lib/ifmail/ifmail -r $nexthop ($recipient)
bsmtp     unix  -       n       n       -       -       pipe
  flags=Fq. user=bsmtp argv=/usr/lib/bsmtp/bsmtp -t$nexthop -f$sender $recipient
scalemail-backend unix	-	n	n	-	2	pipe
  flags=R user=scalemail argv=/usr/lib/scalemail/bin/scalemail-store ${nexthop} ${user} ${extension}
mailman   unix  -       n       n       -       -       pipe
  flags=FR user=list argv=/usr/lib/mailman/bin/postfix-to-mailman.py
  ${nexthop} ${user}
3) virtual 설정 : query 파일 만들기
설정을 위해 /etc/postfix/ 디렉토리 안에 mysql 디렉토리를 생성합니다.
만약 virtual_mailbox_domains 에서 위치를 다르게 잡았다면 다르게 잡은 위치를 지정해주시면 됩니다.
- virtual_domains_maps.cf
user = [db 접속 유저명]
password = [db 접속 유저 패스워드]

# 아래 hosts 는 DB 서버 위치의 IP를 적어주셔야합니다.
hosts = 127.0.0.1

# DB명
dbname = mailbox

query = SELECT 1 FROM virtual_domains WHERE name='%s'
- virtual_mailbox_maps.cf
user = [db 접속 유저명]
password = [db 접속 유저 패스워드]

# 아래 hosts 는 DB 서버 위치의 IP를 적어주셔야합니다.
hosts = 127.0.0.1

# DB명
dbname = mailbox

query = SELECT box FROM virtual_users WHERE email = '%s'
설정 확인 : 이렇게 파일을 생성하였다면 이제 postfix 와 DB 연동을 확인해야합니다.
다음 명령어를 통해 확인합니다.
postmap -q [사용자 도메인] mysql:/etc/postfix/mysql/virtual_domains_maps.cf
postmap -q [사용자 이메일] mysql:/etc/postfix/mysql/virtual_mailbox_maps.cf
요렇게 까지하면 postfix 의 설정은 대체로 마무리 되었으며, 이제 반 정도 끝났습니다.
3. Dovecot 설정하기
이제 제일 어려운 부분에 도착했습니다. 어렵다는 이유가 설정할 파일이 정말 많습니다. 설정되어야하는 부분도 많고요ㅠㅠ
사실 실제로 메일 서버를 구동했을때 문제가 발생하면 80% 로 postfix 의 main.cf 를 보시면 될 것이고, 나머지는 dovecot 쪽 문제입니다. 차라리 postfix 가 더 쉬운게 postfix 는 main 하나만 보면되는데 dovecot은...ㅠㅠ
여튼 시작하겠습니다!
dovecot 에서 설정할 파일은 다음과 같습니다.
당연히 수정하시기 전에 백업은 필수입니다.
1. /etc/dovecot
- dovecot.conf
- dovecot-sql.conf.ext
2. /etc/dovecot/con.f
- 10-auth.conf
- 10-mail.conf
- 10-master.conf
- auth-sql.conf.ext
먼저 다음 dovecot 과 lmtpd, mysql 연동을 위한 추가 패키지를 설치합니다.
다만 저는 혹시나 싶어서 그냥 dovecot 관련 추가 패키지를 모두 설치했습니다(맨 아래)
apt-get install dovecot-lmtpd ## lmtp 관련
apt-get install dovecot-mysql ## mysql 관련
apt-get install dovecot-* ## dovecot 관련 모든 패키지 설치
1) /etc/dovecot/dovecot.conf
- 아래 내용에 사용할 프로토콜 정보를 입력합니다
# Enable installed protocols
#!include_try /usr/share/dovecot/protocols.d/*.protocol
protocols = imap pop3 lmtp
- 파일 내용 중 맨 아래에서 다음 내용의 주석을 해제합니다.
# Most of the actual configuration gets included below. The filenames are
# first sorted by their ASCII value and parsed in that order. The 00-prefixes
# in filenames are intended to make it easier to understand the ordering.
!include conf.d/*.conf
- 마지막으로 맨 아랫줄에 다음 내용을 추가해줍니다.
다만 이 부분은 제가 dovecot 관련 오류가 났을 때 사용했던 설정으로 보통은 빼도 무방하다고 합니다.
service stats {
    unix_listener stats-reader {
        user = [메일 서버 관리 유저명]
        group = [메일 서버 관리 유저명]
        mode = 0660
    }

    unix_listener stats-writer {
        user = [메일 서버 관리 유저명]
        group = [메일 서버 관리 유저명]
        mode = 0660
    }
}
2) /etc/dovecot/dovecot-sql.conf.ext
- 본인이 사용하시는 DB 정보를 넣어주시면 됩니다.
# Database driver: mysql, pgsql, sqlite
driver = mysql
- connect 부분에 사용자의 DB 정보를 넣어줍니다. 앞서 postfix virtual 파일에서 설정했던 내용 그대로 넣으면 될 듯 합니다.
connect = host=127.0.0.1 dbname=mailbox[DB이름] user=[DB접속아이디] password=[DB접속패스워드]
- DB 패스워드 기본 암호화 정보를 입력합니다 : SHA512-CRYPT
# List of supported schemes is in
# http://wiki2.dovecot.org/Authentication/PasswordSchemes
#
default_pass_scheme = SHA512-CRYPT
- password_query : virtual_users 에서 유저 정보, 즉 계정명과 패스워드를 찾아오는 쿼리문입니다.
virtual_users 테이블에서 email 을 uesr로하고 password 가져오는데 이때 email = '%u'
여기서 '%u' 값은 'entire user@domain' 라고합니다. 즉 로그인할때 입력되는 이메일 전체(user@domain 전체)를 의미한다고 생각하시면 될 것 같습니다.
password_query = \
   SELECT email as user, password \
   FROM virtual_users WHERE email='%u'
3) /etc/dovecot/conf.d/10-auth.conf
아래 내용을 각각 주석 해제와 주석 처리해주시면 됩니다.
## 아래 내용은 주석처리 ##
#!include auth-system.conf.ext

### auth-sql 만 주석 해제 ##
!include auth-sql.conf.ext
#!include auth-ldap.conf.ext
#!include auth-passwdfile.conf.ext
#!include auth-checkpassword.conf.ext
#!include auth-vpopmail.conf.ext
#!include auth-static.conf.ext
4) /etc/dovecot/conf.d/10-mail.conf
- mail_location 부분을 추가합니다. 이 부분은 mail 이 도착하는 디렉토리라고 생각하시면 됩니다. 메일은 /var/mail/vhosts/%d/%n 에 저장됩니다.
이때 %d 와 %n 은 각각 메일 도메인, 메일 유저부분이라고 합니다. 즉 test@mail.hjproject.kro.kr 이라면 %d 는 mail.hjproject.kro.kr 이고, %n 은 test가 됩니다.
# See doc/wiki/Variables.txt for full list. Some examples:
#
#   mail_location = maildir:~/Maildir
#   mail_location = mbox:~/mail:INBOX=/var/mail/%u
#   mail_location = mbox:/var/mail/%d/%1n/%n:INDEX=/var/indexes/%d/%1n/%n
#
# <doc/wiki/MailLocation.txt>
#
# mail_location 에 아래 내용 추가
mail_location = maildir:/var/mail/vhosts/%d/%n
- 아래 부분은 주석 해제
# Group to enable temporarily for privileged operations. Currently this is
# used only with INBOX when either its initial creation or dotlocking fails.
# Typically this is set to "mail" to give access to /var/mail.
mail_privileged_group = mail
- 여기는 역시나 오류 났을 때 사용했던 추가 설정 입니다. namespace inbox 에서 inbox = yes 로 변경합니다.
namespace inbox {
  # Namespace type: private, shared or public
  #type = private

  # Hierarchy separator to use. You should use the same separator for all
  # namespaces or some clients get confused. '/' is usually a good one.
  # The default however depends on the underlying mail storage format.
  #separator =

  inbox = yes
5) /etc/dovecot/conf.d/master.cf
- 전체적으로 파일을 수정합니다.
service lmtp {
  unix_listener /var/spool/postfix/private/dovecot-lmtp {
  mode = 0600
  user = postfix
  group = postfix
  #unix_listener lmtp {
    #mode = 0666
  #}
}
  # Create inet listener only if you can't use the above UNIX socket
  #inet_listener lmtp {
    # Avoid making LMTP visible for the entire internet
    #address =
    #port =
  #}
}
- 다음 내용도 수정합니다.
  unix_listener auth-userdb {
    mode = 0666
    user = vir_mailbox
    #group =
  }

  # Postfix smtp-auth
  unix_listener /var/spool/postfix/private/auth {
    mode = 0666
    user = postfix
    group = postfix
  }

  # Auth process is run as this user.
  #user = $default_internal_user
  user = dovecot
}
- 마지막으로 한번 더
## 22.01.20 수정됨 ##
service auth-worker {
  # Auth worker process is run as root by default, so that it can access
  # /etc/shadow. If this isn't necessary, the user should be changed to
  # $default_internal_user.
  user = [메일 서버 관리 유저]
}

service dict {
  # If dict proxy is used, mail processes should have access to its socket.
  # For example: mode=0660, group=vmail and global mail_access_groups=vmail
  unix_listener dict {
    #mode = 0600
    #user =
    #group =
  }
}
6) /etc/dovecot/conf.d/auth-sql.conf.ext
- passdb 부분 수정
passdb {
  driver = sql

  # Path for SQL configuration file, see example-config/dovecot-sql.conf.ext
  args = /etc/dovecot/dovecot-sql.conf.ext
}
- userdb 부분 수정
userdb 즉 메일이 저장되는 장소를 확인하는 듯 합니다. 여기의 %d %n 은 위와 마찬가지로 각각 도메인과 유저를 의미합니다.
userdb {
   driver = static
   args = uid=[메일서버관리계정] gid=[메일서버관리계정] home=/var/mail/vhosts/%d/%n
}
4. 모든 설정 종료
- 드디어 모든 설정이 끝났습니다. 이제 다음 명령어로 postfix 와 dovecot 을 재시작 후 각각 25, 110 혹은 465, 995 등의 포트로 접속해서 오류가 있는지 확인해주시면 됩니다.
sudo service postfix stop
sudo service postfix start

sudo service dovecot stop
sudo service dovecot start
- 메일 서버 로그가 남는 위치는 /var/log 안에 mail 로 시작하는 파일들입니다.
/var/log/mail.log 혹은 /var/log/mail.info /var/log/mail.err 등의 에러가 발생하는 경우 각 로그를 확인하시면서 트러블슈팅하시면 될 것 같습니다.
- 메일서버를 구동하면서 혹시나 SASL 오류 발생 시 아래 패키지를 설치해주시면 됩니다.
sudo apt-get install sasl2-bin
- 원래는 이 포스팅에 outlook 연동까지 마무리하려고 했는데 아무래도 너무 길어져서 다음 포스팅으로 넘기겠습니다. 다음 글에는 outlook 연동과 메일 수신, 발신 테스트 그리고 제 설정 파일들을 git 에 올려서 공유할 예정입니다.
- 이번에 이렇게 mysql 과 연동해보면서 아직도 배울 게 정말 많구나...라는 생각을 하였습니다. 사실 진짜 계획이었던 웹 사이트 회원과 메일서버를 연동하는 것까지도 못갔는데 여기서 이렇게 해매다니 조금 무섭기도하고 이것만 붙잡고 5일째 정되니까 내가 뭐하는거지 라는 생각도 들더라구요ㅋㅋ 또 한편으로는 에러 로그를 확인하고 그에 맞춰서 검색해보고 공부하고 해결하면서 '진짜 재미있구나' 라는 생각도 들었던 것 같습니다. 참 신기하네요ㅋㅋ
- 이제는 웹 페이지 회원과 메일 서버 연동을 위해 달리겠습니다. 해당 내용으로 다음에 다시 돌아오겠습니다.
긴 글 읽어주셔서 감사합니다.
- Github
-제 dovecot + postfix + mysql 설정 파일과 설정 내용들을 올려둔 git 주소를 남겨두겠습니다.
물론 본인이 직접 설정파일을 만져가면서해야 오류가 적지만, 그래도 바로 해보고 싶으신 분들을 위해서 올려두겠습니다.
https://github.com/SeJonJ/MailServerConfig.git
GitHub - SeJonJ/MailServerConfig: Dovecot + Postfix + Mysql 연동
Dovecot + Postfix + Mysql 연동. Contribute to SeJonJ/MailServerConfig development by creating an account on GitHub.
github.com
참고 사이트
아래 모든 분들에게 정말 감사드립니다.
1) dovecot + postfix + mysql 관련된 전반적인 설정파일이 위치한 git 입니다. 여기 발견하고 설정을 통해서 제 모든 문제를 해결했씁니다ㅠㅠ
https://github.com/kirilkirkov/postfix-dovecot-mysql
GitHub - kirilkirkov/postfix-dovecot-mysql: Correct configuration for mail server on Ubuntu with spf and dkim authentication
Correct configuration for mail server on Ubuntu with spf and dkim authentication - GitHub - kirilkirkov/postfix-dovecot-mysql: Correct configuration for mail server on Ubuntu with spf and dkim auth...
github.com
2) virtual 메일 설정을 위한 전반적인 내용이 나와있습니다.
https://wiki.gentoo.org/wiki/Complete_Virtual_Mail_Server/Postfix_to_Database/ko
Complete Virtual Mail Server/Postfix to Database/ko - Gentoo Wiki
Postfix 설치 postfix 설치는 약긴 간단합니다. Postfix 기본 설치 절차를 따르십시오. Postfix 연동 postfix가 기본 수준에서 동작한다면 데이터베이스에 연결할 시간입니다. 접근 권한 획득 PostgreSQL 데이
wiki.gentoo.org
3) postfix 쪽 main.cf 관련되어 설정들을 정말 자세하게 잘 적어두셨습니다. 덕분에 어떤 옵션이 어떤것인지 확실하게 알 수 있었습니다.
https://blog.wise-leader.com/003-mailserver/
NAS 메일서버03-메일함의 결정(가상메일함) - 굿대디의 지식공유 일기
NAS 메일서버03-메일함의 결정(가상메일함) 굿대디의 지식공유 일기 %
blog.wise-leader.com
4) 퍼니오라는 회사 사이트입니다. 정말 자세하게 postfix dovecot mysql 모두 자세하게 설명되어있습니다. 실무자 선생님께 감사드립니다.
http://www.fun25.co.kr/blog/dovecot-postfix-mysql-mail-server
Dovecot, Postfix, MySQL 을 이용한 메일서버 설치 | 퍼니오 호스팅
Dovecot, Postfix, MySQL 을 이용한 메일서버 설치 MySQL 설치 # apt-get install mysql-server 관련 패키지들 설치 # apt-get install postfix postfix-mysql dovecot-core dovecot-imapd dovecot-lmtpd dovecot-mysql self-signed SSL 인증서를 만
www.fun25.co.kr
5) postfix restrictions 설정에 대해서 자세히 설명되어있습니다.
postfix restrictions 에 대해.. 끄적끄적
postfix으로 메일서버 구축하면서 끄적임... (아 어려워..ㅠㅠ 설명이 어려워.. 그림으로 설명해주면 안되나?ㅋㅋㅋㅋ) **추가** Docker로 만들어서 올렸습니다. postfix + dovecot + mysql(mariadb) 연동합니다.
ablog.jc-lab.net
6) 여기는 mysql 대신 sqlite 를 사용하여 설정하는 내용이 포함되어있습니다.
http://workspace.onionmixer.net/mediawiki/index.php?title=Gentoo_postfix_dovecot_sqlite#user_query
Gentoo postfix dovecot sqlite - 흡혈양파의 인터넷工房
gentoo, postfix, dovecot, sqlite howto 개요 postfix 는 MTA(main transfer agent) 로서 qmail[1] 또는 exim[2] 및 전통적인 sendmail[3] 와 같은 역할을 하는 프로그램 집합이다. dovecot 은 POP3 및 IMAP protocol 을 지원하는 서버
workspace.onionmixer.net
7) Error: net_connect_unix(/var/run/dovecot/stats-writer) failed 에러가 났을 때 참고했던 내용입니다.
https://forum.iredmail.org/topic15113-error-netconnectunixvarrundovecotstatswriter-failed.html
Error: net_connect_unix(/var/run/dovecot/stats-writer) failed (Page 1) — iRedMail Support — iRedMail
Pages 1 You must login or register to post a reply Pages 1 You must login or register to post a reply
forum.iredmail.org
'토이 프로젝트 > 서버갖고 놀기 for DevOps' 카테고리의 다른 글
| Jenkins 로 프로젝트 빌드 & 배포하기 - 1) Jenkins 설치 및 설정잡기 (feat. mail 연결) (0) | 2023.04.08 |
|---|---|
| 메일 서버 구축하기 dovecot, postfix - (6) mysql + postfix + dovecot + Thunderbird 연동하기 (0) | 2022.01.29 |
| 메일 서버 구축하기 dovecot, postfix - (4) Outlook 프로그램 연동 (2) | 2021.06.05 |
| 메일 서버 구축하기 dovecot, postfix - (3) dovecot 설치 및 설정 & 유저별 메일 박스 설정 (2) | 2021.05.23 |
| 메일 서버 구축하기 dovecot, postfix - (2) SSL 인증서 생성 & postfix 설치 및 설정 (0) | 2021.05.22 |

댓글